HOT WIRE TOOL
Team Members: Tatiana Tabrani, Michael Sabourin, Josh Dochoda, Thy Vu
This assignment required my team and I to design a hand tool that uses heat dissipated across a nichrome wire that conduces an electrical current. There are several learning objectives related to this assignment. Firstly, this introduced me to molding and casting techniques used to create components of physical porotypes. Secondly, it allowed me to explore how to design a device especially knowing how a material’s property/characteristic lead to its contribution in performing the desired function. Thirdly, it introduced me to basic ergonomic principles that in turn determined the shape and dimensions of the device.
The day we got assigned this, we were given a rundown on the characteristics of different materials, and why they were used in a specific tool. For example, silicon has a high melting point and so is used as molds for baking, etc. We agreed upon that the hand held tool for this assignment required 3 important properties. They are high melting point, low electrical conductivity and low thermal conductivity.
Next, we made a practice prototype to see how to make a mold and how to connect the nichrome and copper wires. We played around with plaster of Paris and silicon whereby we mixed our own ratio and poured it into molds we made. We made a cylinder-shaped mold using aluminum foil and tape, and poured in the plaster after we had connected the wires as desired (Figure 1). We let the plaster cure for approximately 30 minutes, and ours took a few more minutes because the consistency was slightly too watery than the desired consistency.
Finally, we were given a presentation of the basics and general idea of ergonomics, together with collected data. We were then given plasticine to play around with. This allowed us to visualize and feel the importance of ergonomics. Tools have to be made to allow the user to handle it well, safely and comfortably, and this all boils down to the ergonomics of it.
This practice was very important as it showed us the basic uses of molds, the use of plaster, the importance of wiring, and ergonomics. For instance, the nichrome wire cannot touch each other as seen in Figure 1 because it will cause a short circuit.
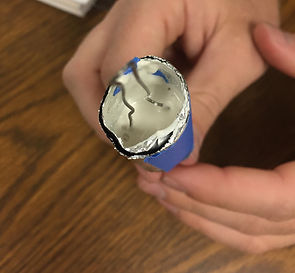
Figure 1
After this practice and gathering from what we had just learned, everyone in the group was first tasked to come up with their own idea and to sketch up a design they think would best fit the functionality of the assignment (Figure 3-6). From this, we gathered to discuss what would be the most ideal design to fit the function of the tool.

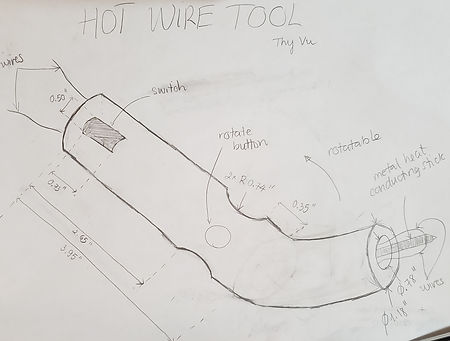
Figure 3 - Tatiana Tabrani
Figure 4 - Thy Vu

Figure 5 - Josh Dochoda

Figure 6 - Michael Sabourin
The design is simple, minimalistic and is able to carry out the desired function. The design chosen was finalized to be somewhat like a screwdriver. To come up with substantial dimensions and a sketch (Figure 7), we used an actual screwdriver as a reference as this makes it more accurate to what is already out in the market. For the main functionality of the tool, we decided to use aluminum, and wrap the nichrome wire around it at the bottom. When it heats up, it will be hot enough and in turn, heat up the tip of the aluminum rod. We had to ensure the nichrome wire heats up at a safe distance away from the user’s hand. In addition, an electrical insulating paper had to be used at the part where the nichrome wire was wrapped around to prevent the circuit from short-circuiting.
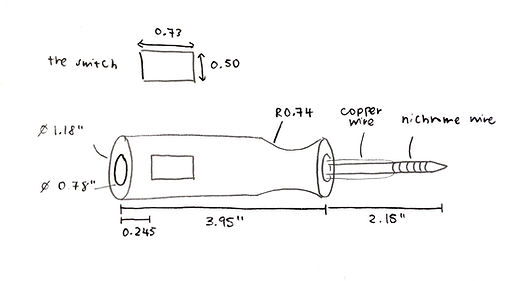

Figure 8
Figure 7
In addition, an on/off switch is needed to control the tool. There were a few different switches available to us (Figure 8), including a button/hold-down switch, and a switch to click on or off in different shapes. We decided to use the rectangularly shaped click switch as we believe it fits best onto the handle and frees the user from having to hold down onto it when using the tool. After the sketch was made, we divided the work amongst ourselves for efficiency.
A CAD part and drawing was made (Figure 9). This is needed because the handle of the tool is 3D printed, and it requires an .STL file. It took approximately 1 hour 20 minutes to 3D print the entire part (Figure 10). The 3D print came out very well and had several rough edges to it, and so we used a blade to clean it up before working on it because they were sharp and is a safety hazard when handled.

Figure 9

Figure 10

Figure 11
Simultaneously, the aluminum rod was made in EPIC. The shaping of the rod, including the tip and the section where the nichrome is wrapped around was done using hand-tools. An electrical insulating paper is wrapped around the section of the aluminum rod where the nichrome wire is wrapped around. As explained earlier, this prevents the tool from short-circuiting. Both the nichrome wire and copper wires were wired together. To do this, we incorporated the method we did in class and soldered the copper wire to the switch (Figure 11), to ensure it stayed in place. (Note: We soldered one of the nichrome and copper wire pair at first, but realized it was pointless because that is the area where the tool will be heating up, and this contradicts the aspect of soldering).
The two components of the tool, handle and aluminum rod is connected by plaster of Paris (Figure 12). We centered the rod as best as we could, and via teamwork made the plaster and slowly poured it in using a syringe to prevent air bubbles. It can also be seen that the copper wires come out at the other end of the handle, to allow it to connect to the power supply.
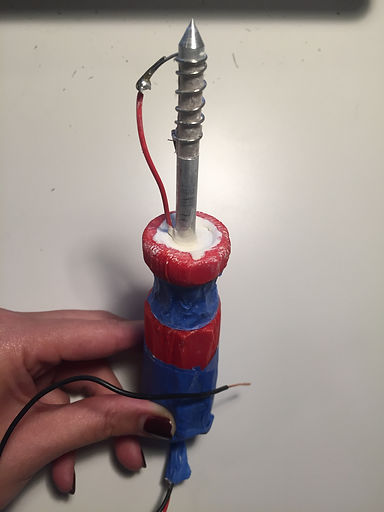
Figure 12
Result and Evaluation
In conclusion, this assignment perfectly conveyed the learning objectives mentioned earlier. To reiterate, this introduced me to molding and casting techniques used to create components of physical porotypes. Secondly, it allowed me to explore how to design a device especially knowing how a material’s property/characteristic lead to its contribution in performing the desired function. Thirdly, it introduced me to basic ergonomic principles that in turn determined the shape and dimensions of the device.
We learned how to work more as a team and successfully managed to split up the work well between ourselves, playing on our strengths. After tool when held felt really comfortable, and fit into any size hands. We could come to this conclusion because between our group, there is a wide variety of heights. I think we implemented the importance of ergonomics well into the tool.
We did not manage to test if the product/wiring actually work, but I believe there is a high possibility of it working. Nonetheless, I truly enjoyed this project and it really allowed me to work hands-on, and make use of the 3D printer. I believe this will help me in further assignments down the line.